 English
 Français
  Deutsch
 Welcome to our Support Center
Q. Installation Procedures – Engcon Rotative Coupler Calibration
iDig Compatibility
- The iDig System and the Engcon rotative coupler may be connected via a CAN Communication. To be sure that your iDig system is compatible with the CAN communication, you need to check 2 important points:
- The CAN communication is compatible with the C8 iDig Control Box only.
a) C8 is written on the Control Box serial number sticker.

- The iDig System and the Engcon rotative coupler may be connected via a CAN Communication. To be sure that your iDig system is compatible with the CAN communication, you need to check 2 important points:
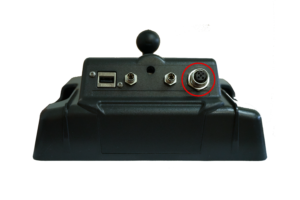
2. The CAN communication is compatible with the CAN capable iDig Control Box Cradle only.
a) Cradle compatible (CAN connector M12)
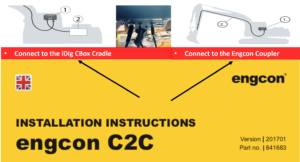
Engcon Tilt Rotator Coupler & Engcon C2C Control System

Attention! Please refer to the Engcon documentation!
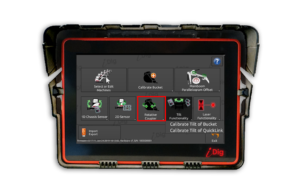
Setup Rotative Coupler:
![]()
- To access this function there needs to be a CAN cable connected to the Control Box Cradle, otherwise the button will be grayed out and unusable.
- With a CAN cable connected, press the button “Rotative Coupler” to start the calibration process.
![]()
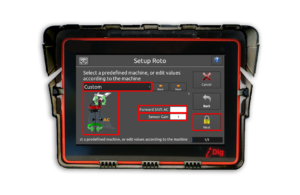
- Select the predefined Engcon coupler from the drop down menu.
- If the coupler is not listed in the drop down menu, enter the forward shift AC value between the rotative coupler axis and the axis of rotation (pivot point) between the dipper stick and the quick coupler.
- Enter “1” for the Sensor Gain value.
- Click on “Next”.
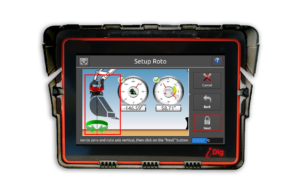
- Set the bucket rotation to zero and the rotative coupler axis vertical.
- Click on “Next”.
- The rotative coupler calibration is done, but not the tilt calibration!
- Refer to the “Tilt Bucket Calibration Procedures” detailed earlier in this manual.
