 English
 Français
  Deutsch
 Welcome to our Support Center
I. Installation Procedures – Main Boom & Dipper Stick Calibration
- This procedure requires you to fully extend the main boom and the dipper stick out in front of the machine so make sure your work area has enough space to do so safely.
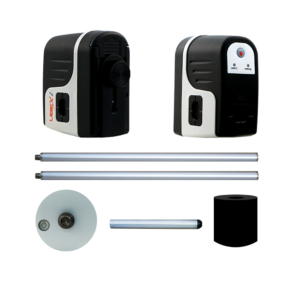
- You will also need a tripod, preferably an elevating tripod. From your iDig kit you will need: Laser Pointer (XB525), Tripod Mount (XD477), Magnetic Pivot Target (XD470), Laser Pointer Adaptor (XD478) and the Extension Poles (XD471).
![]()
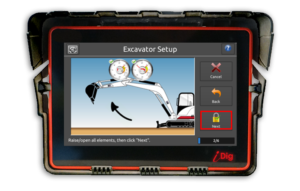
- It is recommended that you remove the bucket to allow ease of calibration. Once removed realign the cab parallel to the tracks and press “OK”.
![]()
- If you’ve not already done so, attach the Sensors to the appropriate elements.
- If the sensor bubble(s) are red the system is missing the according sensor(s). You need to pair them with the system. Follow the instructions detailed later in this manual. Press “Next”.
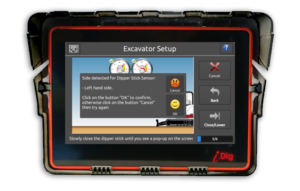
The system will now automatically detect which side of the elements the Sensors have been installed on:
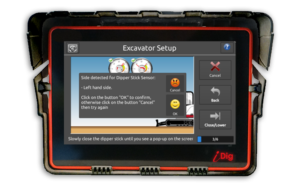
Dipper Combo Sensor
![]()
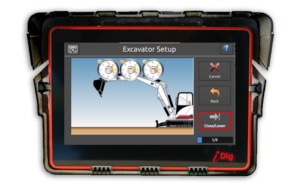
- Raise the boom and dipper stick, press “Next” when the green check mark appears.
![]()
- Lower the dipper stick ONLY until the pop-up screen appears. Follow the directions on the screen.
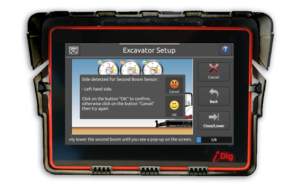
The system will now automatically detect which side of the elements the Sensors have been installed on:
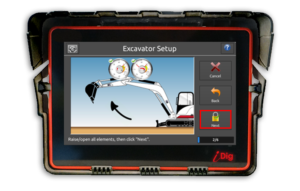
2nd Boom Sensor (if applicable)
![]()
- Raise the boom and dipper stick again, press “Next” when the green check mark appears.
![]()
- Lower the main boom ONLY until the pop-up screen appears. Follow the directions on the screen.
The system will now automatically detect which side of the elements the Sensors have been installed on:
Main Boom Sensor
![]()
- Raise the boom and dipper stick again, press “Next” when the green check mark appears.
- Lower the main boom ONLY until the pop-up screen appears. Follow the directions on the screen.
- If possible, remove the bucket before starting this procedure. Re-attach the bucket when completed.
- Once the Sensor sides have been determined, you will now begin the main boom and dipper stick calibration.
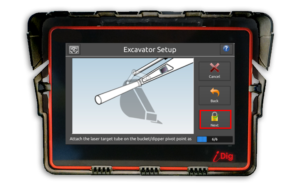
- This will be done by placing the Magnetic Pivot Target in the center of the bucket pivot pin and directing the Laser Pointer onto this target.
- Then you will move the main boom and dipper stick through a series of movements placing the tube onto the laser beam each time. Do NOT rotate the cab during this process. You may rotate the laser pointer to hit the Magnetic Pivot Target.
- Make sure to achieve the extreme positions of fully extended and fully tucked in by the machine.
- This process is repeated again by raising the height of the Laser Pointer using the Extension Poles provided.
![]()
- Attach the Magnetic Pivot Target on the bucket pivot point. Press “Next”.
![]()
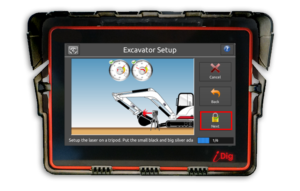
- Place the Laser Pointer onto the tripod in front of the machine. Ensure that the tripod is level and the Laser Pointer is clear of the boom when being raised and lowered, both when the Laser Pointer is in a low and high position. Keep the legs of the tripod clear of the machine to avoid vibration. Press “Next”.
![]()
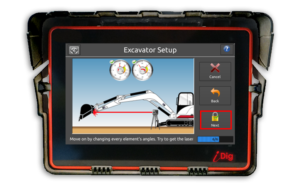
- Repeat this process 6 times in total (10 if using 2nd boom) bringing the laser beam onto the Pivot Target each time. For maximum accuracy try to keep the laser point on the same spot on the tube each step. Press “Next”.
- Raise the Laser Pointer to a new, higher elevation using the extension tubes provided. Do NOT move the tripod while unscrewing and replacing the laser pointer on the tubes!
- Move the main boom and dipper stick through a series of movements placing the laser beam onto the tube each time.
- Make sure to achieve the extreme positions of fully extended and fully tucked in by the machine.
- For maximum accuracy ensure that the laser point is hitting the same spot on the tube at each step.
![]()
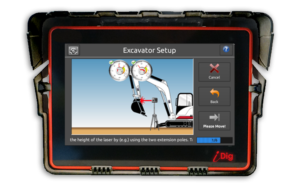
- Increase the Laser Pointer height by attaching the Extension Tubes. The next steps are a repeat of the previous steps, except now the Laser Pointer is raised to a new, pre-determined elevation.

![]()
- Repeat this process 6 times bringing the laser beam onto the target tube each time. Press “Next” after each step when the green check mark appears on the screen.

- This completes the main boom and dipper stick calibration! Press “Done” to continue.