 English
 Français
  Deutsch
 Welcome to our Support Center
L. Installation Procedures – Bucket Calibration
Calibrating the Bucket
- There are two methods of calibrating the Bucket: Manual and Automatic. The manual process is much quicker and more accurate.
- The automatic process is similar in concept to the Excavator setup whereby you will move the bucket through a series of incremental angle changes while keeping the bucket tip/edge on a fixed point.
- If the Bucket Sensor is located on the dog-bone, automatic calibration is your only option.
- For manual calibration, you will need a magnetic plumb-bob and a tape measure.
- A tape measure and something to use as the reference point is required for automatic calibration. The heavier the item the better since the item can not move during the calibration process.
![]()
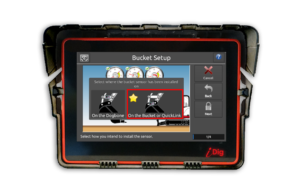
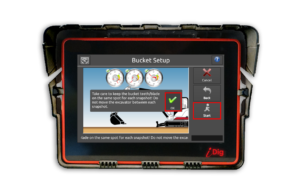
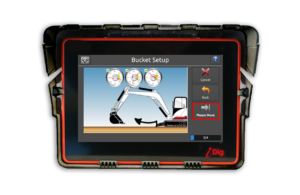
- Begin by selecting the location where the sensor has been installed.
![]()
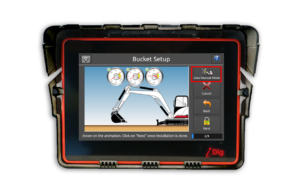
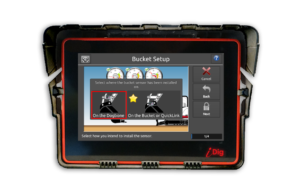
- If you selected Quick Link, then press “Go To Manual Mode”. If the Bucket Sensor was placed on the Dog-Bone press “Next”. The following section will detail the Manual Calibration process.
Manual Bucket Calibration
- Place a magnetic plumb-bob on the bucket pivot pin.
- Drop the string line below the edge of the bucket tip/edge. Make sure the string is still.
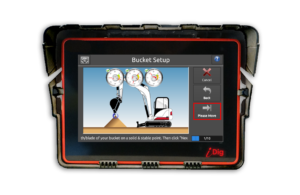
- Slowly close the bucket until the tip/edge of the bucket is just touching the string. The center of the bucket pivot pin should be plumb to the tip/edge of the bucket. This will set the vertical position for the Bucket Sensor.
- Make sure that the machine’s hydraulics hold the main boom steady and doesn’t drift down. If it does, perform the vertical plumb last in this calibration sequence.
![]()
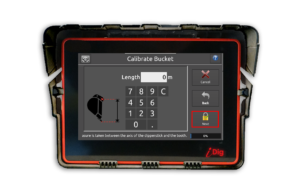
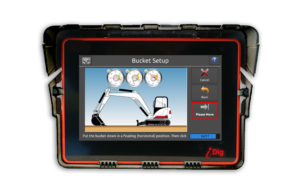
- Take a measurement from the center of the bucket pivot pin to the tip of the teeth/edge of the bucket and enter the value. Press “Next”.
![]()
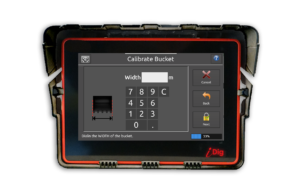
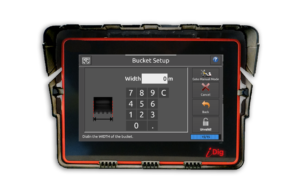
- Measure the width of the bucket and enter the value. Press “Next”.
![]()
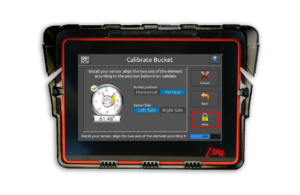
- Press “Vertical” so that it is highlighted in blue. Select which side the Bucket Sensor has been installed so that it is highlighted in blue. NOTE – sensor side refers to which direction the plastic cap is facing. If it’s installed on the left side but inside the coupler, the sensor is on the Right Side. Press “Next”.
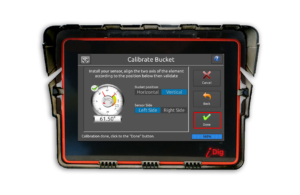
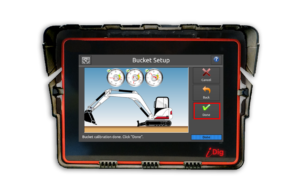
- The bucket will be named in your system as New Bucket. You’ll need to go into the System Settings menu to rename the bucket. Additionally, you’ll need to perform the Floating Bucket procedure so that the bucket on your screen matches the physical position of the actual bucket. See the next screen for these instructions. Bucket calibration is done so press “Done”!
To change the bucket name and to activate the Floating position of the bucket:
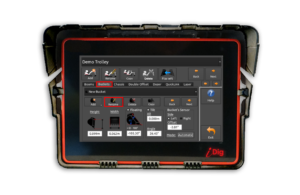
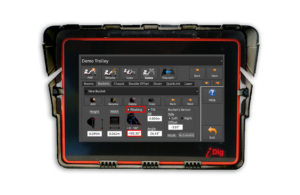
- Press the Gearbox icon on the main screen.
- System Settings >
- Select or Edit Machine >
- Select the correct machine and press Edit Machine Parameters >
- Select the Bucket Tab.
![]()
- To rename your bucket press the “Rename” button and type in your alpha numeric name.
![]()
- Touch the word “Floating” to place a check mark in the box. Touch the angle box to proceed to the next screen.

![]()
- Make sure your bucket is flat on the ground like the illustration below and then press “Offset Wizard”.

![]()
- Press the green checkmark on the screen.
- Press “Apply”. Your bucket calibration is now complete!

Automatic Bucket Calibration – Dog Bone
- You will require a stable point on which to place the tip/edge of the bucket.
- This point needs to be high enough so that you can open and close the bucket as much as possible.
- The point needs to not move, deflect of change position when the bucket is placed on it.
- Be careful with curved dog bones since they are extremely difficult to calibrate depending upon where the sensor is placed. Ideally, you should weld a plate onto the dog bone so that the center of the Sensor is in line with the two pivot pins that connect to the dog bone.
![]()
- The pop-up screen will remind you to take care when placing the tip/edge of the bucket to keep on the EXACT same point during the calibration process. Press “OK” and then “Start”.
![]()
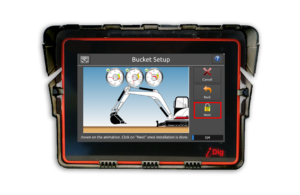
- Select “On the Dog Bone” to commence the automatic calibration process.
![]()
- Once the Sensor is in position press “Next”
![]()
- The system needs to detect which side of the bucket the Sensor is installed. Raise the dipper stick high enough off the ground so that you can open the bucket. Press “Next”

![]()
- Slowly close the bucket until the pop-up screen appears. If the correct side is determined, Press “OK” to confirm and continue. Otherwise, press “Cancel” and repeat the process.
The automatic calibration of the bucket requires the bucket to be placed on the EXACT same point while incrementally changing the angle of the bucket. There are ten steps to this process. Note the counter on the bottom right-hand side of the screen. It will show you the progress you are making.
![]()
- Fully open the bucket and place the tip/edge of the bucket on a point. Press “Next”.

![]()
- Repeat this process 10 times, incrementally changing the angle of the bucket and placing it back on the EXACT point each time. On the 10th and final point, the bucket should be as closed as possible so that the bucket tip still touches the reference spot. Press “Next”.
![]()
- Place the bucket on the ground in a flat floating position. Press “Next”. This will ensure that the bucket position on the main working screen mirrors the actual position of the bucket.
![]()
- Enter the bucket width and Press “Next”
![]()
- Your automatic bucket calibration is complete! Press “Done”
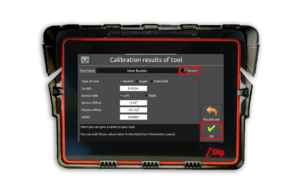
- The final screen shows your calculated length and offset for the bucket Sensor. If the values don’t look correct press “Recalibrate” and repeat the process. Otherwise, you can rename your bucket and press “OK”